My Free Patterns

Saturday, April 30, 2011

Spring Pasta

If you've read my other recent food posts, you'll know that I love asparagus.  This is another delicious dish I have just tried.  I've linked to the original, which I am sure would be wonderful, however I had to modify to what was in my cupboard.  I try not to run out to the store for extra ingredients if I can avoid it.


Ingredients

  • 1 bunch asparagus
  • 1/2 cup plain Greek-style yogurt
  • 1/4 cup milk
  • 2 garlic cloves, peeled, but left whole 
  • 1/2 cup frozen peas
  • 3 slices back bacon (optional)
  • 25g parmesan, grated
  • 250g pasta, any shape/kind you have
  1. Cut (or snap) off and discard the woody ends of the asparagus, then neatly cut the tips away from the stalks. Keep the tips and stalks separate. In a small saucepan heat the yogurt, milk and garlic to just below a boil. Take off the heat, set the pan aside. 
  2. Dice bacon and cook.  Set aside. 
  3. Cook the asparagus stalks in boiling salted water for about 4-5 mins until tender, drain, then tip into the milk mixture with the grated parmesan. Blitz with a hand blender (or a Cuisinart) until smooth.
  4. Cook the pasta according to pack instructions, then throw in the tips and frozen peas (get crazy and add extra veg you want!) 2 mins before the end of cooking time. Gently reheat the milk mixture, drain pasta, then tip into a bowl with the milk mixture. Add in bacon.  Toss, divide into pasta bowls, top with parmesan shavings if desired and serve. 
The hubby and I LOVED this dish. It is fast, healthy, and satisfying! A few days later I was wanting to relive the goodness of this dish, so I came up with another one, for lunch.

What I did was to cook enough pasta for one bowl (ok, I made a bit too much) for my lunch.  When the pasta was almost done I added some frozen peas and frozen spinach to the water.  Then I drained it all and added it back into the warm pot.  I added about 1/2-1 tbs butter and some grated parmesan cheese.  Then I chopped a hard boiled egg onto the pasta, sprinkled with salt and pepper and tucked in.  It was great, filling, and fast (I already had some eggs boiled).


    Thursday, April 28, 2011

    Ready for Summer

    I come from a distinguished line of women that sew.  My grandma and aunt quilt, and my mother sews clothing, and other useful items.  When I was growing up she made me loads of clothing, including swim suits!  She even made my wedding dress.  

    Mom adding the lace to my wedding dress

    Now she makes stuff for my kids, including a Halloween costume every year.


    This is the first one she made the girls, a fairy costume!  We are still getting use of of them!


    This year's costumes
     
    Years ago when I was in Grad school my Grandma replaced her sewing machine and gave me her old one.  I still have it today, and I love it well.  I've made a few small/throw quilts (and hopefully one more soon) 
    Before the girls decided it was pink or nothing

    I sew from time to time. I really would like to take a class and improve my skills, or at least sew more often.


    Recently I was having a rustle around in my craft cupboard, because you never know what you might find.  Well I found fabric and a skirt pattern that I bought a couple of summers ago in Michigan.  Viola, I thought, I will whip up a skirt for the summer.  It said right on the pattern, "One Hour!"


    Well, they lied or I am terribly slow.  Part of it is time constraints, the kids keep interrupting, dinner needs cooked, you know the drill.  But I've finally finished it, and my daughter (she's 5) kindly took a picture for me.


    So that's what I've been up to lately.  I have a couple of dress patterns that are waiting to be made, wish me luck!

    Wednesday, April 27, 2011

    I've been featured!

    A BIG yay for my first time being featured on someone else's blog!

    You can check the post out here: 


    On the very cool Ginger Snaps website.


    I met Ginger through the Whoopdwhoop site, when I asked if she would send a swap "across the pond."  She did, and then we swapped blog addresses as well.  I've met some people that aren't willing send stuff aboard, but I've also met some really great ones that will. 

    Tuesday, April 26, 2011

    Rhubarb Jam

    One of the first things I do each time we move house is to plant rhubarb.  It is such a lovely plant, requiring very little care and is ready to start eating in about 2 years (depending on the size you plant).  I have 5 plants just now, of various ages, and I'll miss them when we move.


    Well, with the husband dieting, the girls not liking rhubarb, and myself not wanting to be a glutton and eat an entire rhubarb crumble by myself, I decided to make jam instead.  That way I can have the tart sugary goodness all year round.  I've never made rhubarb jam before, but I did eat it once at a B&B we stayed at in the before era (you know, before we had kids) and liked it quite a lot.  I found a rather tasty looking recipe on the BBC Good food site, so I gave it a try.  I didn't have a kilo, so I reduced the recipe to suit what I did have.


    812g rhubarb
    812g caster sugar
    8g pectin
    juice of 1 lemon
    1 tsp vanilla (I didn't have pods and didn't want to run to the store)


    Directions:


    1. Put a small plate in the freezer. Put the rhubarb into a preserving pan or your largest saucepan with the sugar and halved vanilla pods. Heat gently, stirring, until all the sugar has dissolved, then squeeze in the lemon juice and increase the heat. 


    2.  Boil for about 10 minutes, skimming off the scum as you go (the fruit should be soft, I mashed my further with a potato masher). Test for setting point by spooning a little onto your chilled plate. After 1-2 mins, push your finger through the jam - if the surface wrinkles it is ready, if not, keep cooking for 2-min intervals, testing in between. (Or if you have a sugar thermometer it should reach 105C)


    3.  Once the jam is ready, let it cool for about 15 mins before ladling into warm sterilised jars and sealing. Will keep for 6 months in a cool, dark place.


    I got 3 full jars and one that is about 1/2 full. You know what that means right? I have to open the 1/2 full jar and eat it first.  It tastes wonderful on some home made bread!


    Monday, April 25, 2011

    2 Egg Omlet

    I am doing my very best to be a good girl, and not eat too many sweets.  It is hard for me, since I love all things baked.  Or fried.  Or generally not good for you.

    The other day I was at the shop and I picked up a copy of the magazine Delicious, which I had never read before.  It was fabulous!  I read it cover to cover and ear-marked just about 10 recipes to try.  Here is one that I adapted to suit myself, and it was delicious.  It was a great lunch, and would be a good dinner when hubby is at the hospital late.

    2 Egg Omelet

    Crack 2 eggs into a bowl and whisk with a fork until frothy.  Don't add milk--I was trained to add a bit of milk by my mother, but it really isn't necessary for this recipe.  Do add a bit of white pepper though, it is lovely!  Set aside.

    I don't like raw tomatoes (one of my many quirks) so I sautéed 1/2 a tomato and and a handful of raw spinach in a tiny bit of olive oil until they were soft.  I added a bit of salt and pepper and garlic powder. Then I took them out of the pan (plopped them on my plate is more accurate.)
    You can even see the steam coming off it!

    I have a lovely little anondized frying pan that is perfect for the little omelet.  It doesn't need much oil and it is such a good tool I feel a better cook when I use it.  My point here is that I didn't need to add any more oil, you might need to if you have a different style pan.  Add the eggs and cook on a medium heat.  When the edges start to get done, use a spatula to lift one side a bit and tilt the pan so the egg runs under.  Then do it again on the other side.  This prevents a raw bit in the middle.  I can't abide undercooked eggs.


    When the egg is cooked all the way through (you can flip it over if you have the confidence), add your favorite ingredients to one half of the omelet.  Mine were:
         * sautéed 1/2 tomato and handful of spinach
         * 2 thin slices of ham lunch meat, diced
         * a bit of grated Swiss cheese


    Then fold the omelet over and cook a wee bit longer until the cheese is melted and it is hot through.  Enjoy!


    I had the omelet with my home made baked beans.  You can follow the link to the recipe if you are interested.  They are perfect for beans on toast!

    Wednesday, April 20, 2011

    Funnel Cake Fun

    Through the course of my many blog hops, I ended up at a Latte' with Ott, A and saw the Clabber Girl Contest going on.  I can't help but be interested in 
     A) baking
       B) a contest 

    I'm not so very competitive, but I do love to share recipes with other people.  I also like to take yummy, scrummy, perhaps high in fat or calorie recipes and try to trim them down so they are healthier, but still delicious.  I know that funnell cakes are traditionally deep fried, but I'm just not having that in our house.  I fried each cake in about 1 tbs canola oil, which I will admit made them more "cake-like" and less crispy.  They were however, still delicious.  Here is my take on Funnel Cakes!


    I reduced the recipe to make 4 funnel cakes, which is perfect for the girls and I to have as an afternoon snack.  There isn't much point in having left overs, or having too many and wanting to eat them all! 

    Ingredients

    • 1 egg
    • 1/2-3/4 cup milk
    • 1 tablespoon white sugar
    • 3/4 cup and 2 tablespoons all-purpose flour
    • 1/8 teaspoon salt
    • 1/2 teaspoon baking powder
    • 3-4 tbs canola/vegetable oil

    Directions

    1. In a medium bowl, mix salt, baking powder, and flour. Set aside.
    2. In a large bowl, whisk together egg, sugar and milk. Add flour mixture and beat until smooth. Batter will be thin enough to run through a funnel. I had to add more milk to the mixture, but I didn't measure how much.  I just added until it was thin.  Conversely, the instructions say to add the flour a bit at a time until you reach desire consistency.
    3. In a skillet, heat 1 tbs oil to 375 degrees F (190 degrees C).
    4. Put your finger over the bottom opening of the funnel, and fill the funnel with a generous 1/2 cup of the batter. Hold the funnel close to the surface of the oil, and release the batter into the oil while making a circular motion. Fry until golden brown. Use tongs and wide spatula to turn the cake over carefully. Fry the second side one minute.  Sprinkle with sifted confectioners' sugar or cinnamon sugar. Add 1 tbs oil for each funnel cake you will fry.  If you have a good non-stick pan you can actually skip most of the oil, but the edges won't be crispy.


    A bit of sewing

    It would seem that all of a sudden my girls are tearing holes in their trousers left and right (legs that is!).  I've decided to turn it into a challenge, and I will not let the holes win!  In channelling my cheap frugal self I'm experimenting with ways to patch the holes and extend the use of their clothing.


    Previously I've just used the store bought iron-on patches, which work fine on black trousers but not so great on coloured ones.  These pink trousers were bought pre-loved on Ebay.  I swear I should get a job doing promotional work for Ebay, I love it that much.  I buy, I sell, I find all kinds of wonders. But I digress.  The trousers have lasted a good long while before the hole appeared.  

    In fact they are just wearing thin over the whole knee area, but I figure if I patch them the girls can get use of them through the summer.


    I look a piece of bondaweb and cut it to the size of a piece of fabric I had selected. 


    Then I ironed the fabric and bondaweb together to make a patch.  Next I peeled the backing off the bondaweb and ironed the patch over the hole on the knee. 


    To prevent it from peeling off in the washing machine, I hand stitched around the edge.  I used invisible thread, which to me is like sewing with fishing line, but I do like that it doesn't show up.  I think it ended up looking a bit "shabby chic" and my daughters like the trousers even more than before.


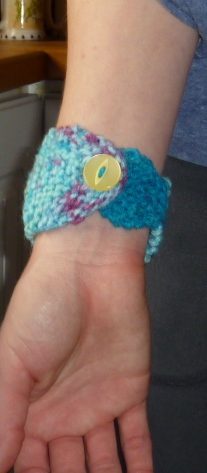
    Lastly, just so I don't forget my other fibre obsession, last night I knit a couple of bracelets while I watched TV.  I suppose maybe wrist cuff is a more accurate description, but they are cute and fun.  I used some left over acrylic I had in my stash.

    I am going to list them for a swap on Whoopdwhoop, a site which I will dedicate a future post to.  I'm in love with it, there is a button on the side bar if you want to check it out.  It is a non-monetary craft swap site!  


    Have a great weekend everyone, happy crafting!!


    Related Posts Plugin for WordPress, Blogger...